If you’ve ever trained a machine learning model and wondered, “How do I deploy it so others can actually use it?”, this guide is for you.
In this hands-on walkthrough, you’ll learn how to:
- Train a simple ML model using scikit-learn
- Serve it as an API using FastAPI
- Containerize the app with Docker/Podman
- And finally, deploy it on Kubernetes using Deployment, Service, and Ingress objects
By the end, you’ll have your own machine learning model running on Kubernetes, ready to handle real-world prediction requests.
Watch the full tutorial here:
Get the complete code and YAML files on GitHub: GitHub Repository
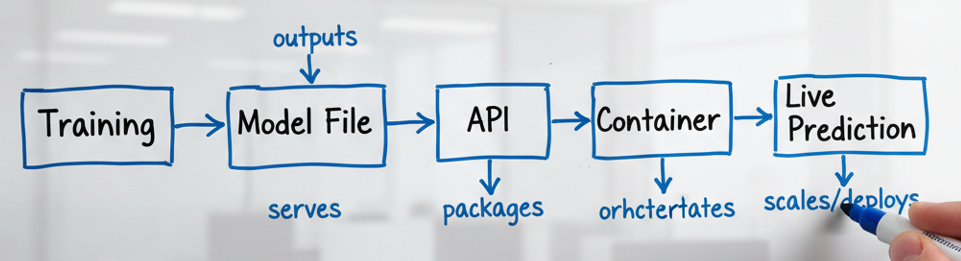
Step 1: Understanding the ML Deployment Flow
Before we jump into code, let’s clarify what “deployment” really means in the ML world.
- Training: The process of teaching a model to recognize patterns from data. For example, using the Iris dataset, we train a RandomForest model to predict flower species.
- Model File (model.pkl): After training, we save the learned model to a
.pklfile — this file stores all the patterns the model has learned. - Inference: When we use the trained model to make predictions on new data.
- Deployment: Turning the model into a live service that can respond to requests — typically through an API.
The typical flow looks like this:
Step 2: Train a Simple ML Model
We’ll start by training a small RandomForest model using the Iris dataset.
Create a file named <em><strong>train_model.py</strong></em>:
from sklearn.datasets import load_iris
from sklearn.ensemble import RandomForestClassifier
import joblib

iris = load_iris()
X, y = iris.data, iris.target

clf = RandomForestClassifier(n_estimators=10)
clf.fit(X, y)

joblib.dump(clf, "model.pkl")
print("Saved model.pkl")
Run it locally:
python3 train_model.pyOnce done, a model.pkl file will be created, which will be used for predictions.
Step 3: Build the ML Inference API Using FastAPI
Next, we’ll create an API that loads the model and serves predictions.
This makes our machine learning model accessible to users and other services.
Create a file named <em><strong>app.py</strong></em>:
from fastapi import FastAPI
from pydantic import BaseModel
import joblib
import numpy as np

app = FastAPI()
model = joblib.load("model.pkl")

class Instance(BaseModel):
    data: list

@app.get("/healthz")
def health_check():
    return {"status": "ok"}

@app.post("/predict")
def predict(inst: Instance):
    data = np.array(inst.data).reshape(1, -1)
    prediction = model.predict(data).tolist()
    return {"prediction": prediction}
Run the API locally:
uvicorn app:app --host 0.0.0.0 --port 8000Test it using curl:
curl -X POST http://localhost:8000/predict \
-H "Content-Type: application/json" \
-d '{"data":[5.1,3.5,1.4,0.2]}'
You should get a prediction instantly.
Step 4: Containerize the ML App
To run this app on Kubernetes, it must be containerized.
Create a Containerfile (or Dockerfile):
FROM python:3.11-slim
WORKDIR /app

RUN apt-get update && apt-get install -y --no-install-recommends build-essential && rm -rf /var/lib/apt/lists/*
COPY requirements.txt .
RUN pip install --no-cache-dir -r requirements.txt

COPY model.pkl .
COPY app.py .

EXPOSE 8000
CMD ["uvicorn", "app:app", "--host", "0.0.0.0", "--port", "8000"]
Build and run it locally:
podman build -t ml-demo .
podman run -p 8000:8000 ml-demo
Now your ML inference API can run inside a container, and it’s portable, isolated, and production-ready.
Step 5: Deploy on Kubernetes
Once your image is built and pushed to a registry (like Quay or Docker Hub), create three Kubernetes manifests.
Deployment
apiVersion: apps/v1
kind: Deployment
metadata:
  name: ml-demo
spec:
  replicas: 1
  selector:
    matchLabels:
      app: ml-demo
  template:
    metadata:
      labels:
        app: ml-demo
    spec:
      containers:
      - name: ml
        image: quay.io/nikhil811/techinik:k8s
        ports:
        - containerPort: 8000
Service
apiVersion: v1
kind: Service
metadata:
  name: ml-demo-svc
spec:
  selector:
    app: ml-demo
  ports:
  - port: 80
    targetPort: 8000
  type: ClusterIP
Ingress
apiVersion: networking.k8s.io/v1
kind: Ingress
metadata:
  name: ml-demo-ingress
  annotations:
    kubernetes.io/ingress.class: "nginx"
spec:
  rules:
  - host: rke2-server
    http:
      paths:
      - path: /
        pathType: Prefix
        backend:
          service:
            name: ml-demo-svc
            port:
              number: 80
Apply them all:
kubectl apply -f .Check resources:
kubectl get pods,svc,ingressFinally, test your deployed model via the ingress URL:
curl -X POST http://rke2-server/predict \
-H "Content-Type: application/json" \
-d '{"data":[5.1,3.5,1.4,0.2]}'
You’ve just deployed a machine learning model on Kubernetes!
Step 6: Recap
Let’s recap what we achieved:
- Trained a machine learning model using Scikit-learn
- Built a prediction API using FastAPI
- Containerized the app with Docker/Podman
- Deployed it on Kubernetes using Deployment, Service, and Ingress
This is the exact workflow followed in production ML systems from training to inference to deployment.
In the next guide, we’ll scale this app using a Horizontal Pod Autoscaler and add Prometheus monitoring for real-time insights.
Final Thoughts
Machine learning deployment doesn’t have to be complicated.
With tools like FastAPI, Docker, and Kubernetes, even beginners can build scalable ML systems that run anywhere.
So go ahead train your model, containerize it, and deploy it.
Your next AI-powered microservice is just a few commands away.