Today, we’ll focus on automating Python code quality checks using PyLint. While running PyLint manually can be a valuable learning experience, it is not practical for larger projects. In this blog, we’ll leverage GitHub’s prebuilt PyLint workflow for seamless integration and automation.
If you’re unfamiliar with GitHub Actions, a powerful CI/CD tool for automating workflows, check out the official GitHub Actions page to explore its features and capabilities
The Role of PyLint in Code Quality Automation
PyLint serves as a powerful static analysis tool tailored for Python projects. It is designed to:
- Detect and highlight potential coding errors early.
- Enforce adherence to established coding conventions.
- Suggest improvements to enhance the quality and maintainability of your codebase.
Using PyLint checks into automated workflows using GitHub Actions ensures that coding guidelines are consistently followed across your team. This integration not only reduces manual effort but also helps maintain high standards, ultimately boosting productivity and collaboration.
Workflow Overview
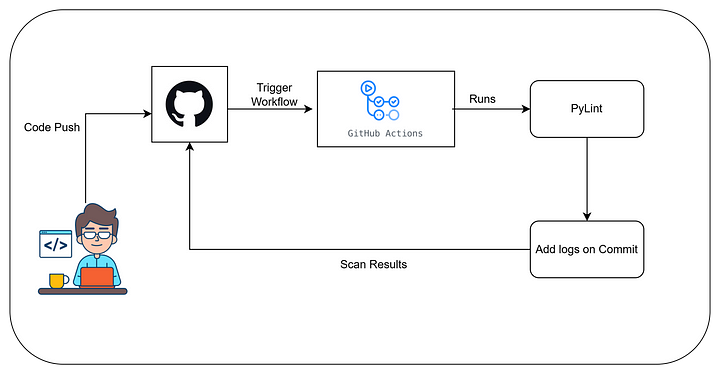
Let’s outline the process using a simple flow:

- Code Changes: A developer writes or modifies Python code.
- Repository Push: Once changes are ready, they are pushed to the GitHub repository.
- Triggering GitHub Actions: The push event triggers the GitHub Actions workflow.
- Running PyLint Checks: The prebuilt PyLint workflow checks the code for issues, enforcing standards and generating a report.
- Result Display: Results are added back to the commit as logs or are displayed directly in the GitHub Actions interface for the developer to review.
Setting Up the PyLint Workflow
GitHub provides a prebuilt PyLint workflow that makes setup straightforward. Here’s how to configure it:
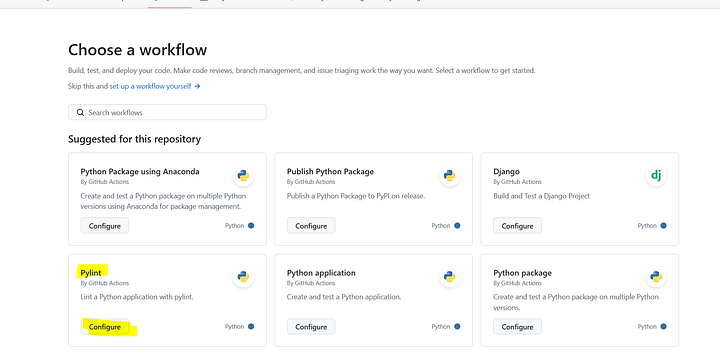
- Navigate to the Actions tab in your GitHub repository.

- Click on New Workflow. If Python-related workflows are suggested, select the PyLint workflow. If not, search for it manually.

- Click on Configure to generate the workflow file.

name: Pylint

on: [push]

jobs:
  build:
    runs-on: ubuntu-latest
    strategy:
      matrix:
        python-version: ["3.8", "3.9", "3.10"]
    steps:
    - uses: actions/checkout@v4
    - name: Set up Python ${{ matrix.python-version }}
      uses: actions/setup-python@v3
      with:
        python-version: ${{ matrix.python-version }}
    - name: Install dependencies
      run: |
        python -m pip install --upgrade pip
        pip install pylint
    - name: Analysing the code with pylint
      run: |
        pylint $(git ls-files '*.py')
The generated workflow:
- Triggers automatically on every push to the repository.
- Runs on GitHub’s hosted runners with the latest Ubuntu version.
- Includes a matrix strategy to test the code on multiple Python versions (e.g., 3.8, 3.9, 3.10).
Here are the key steps in the workflow:
- Check Out Code: Retrieves the code from the repository.
- Install Dependencies: Installs
pipand PyLint. - Run PyLint: Analyzes all Python files in the repository and generates reports
Testing the Workflow
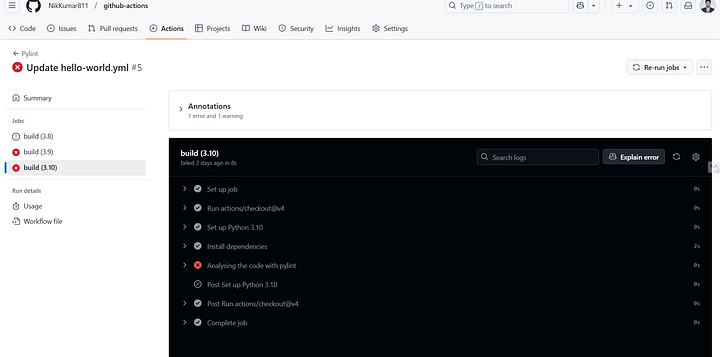
To test the workflow, push changes to the repository. GitHub Actions will automatically trigger the configured workflows. Here’s what happens:
- PyLint workflow run simultaneously.
- PyLint checks Python files in the repository across the specified Python versions.
- Logs and reports are generated, highlighting any issues such as missing docstrings, snake_case violations, or unused imports.
For instance, if a file contains unused imports or lacks docstrings, PyLint will flag these issues in the logs. Developers can then resolve them by modifying the code accordingly.

Automating PyLint checks using GitHub’s prebuilt workflows is a time-saving and efficient way to maintain consistent code quality. By integrating this into your CI/CD pipeline, you can catch potential issues early and streamline the development process. If you’re new to GitHub Actions, check out our GitHub Actions for Beginners blog to get a strong foundation. This guide will help you understand the basics before diving deeper into advanced workflows.


