
Ansible, renowned for its simplicity and efficiency in configuration management, offers a powerful feature that often remains in the shadows — the Filter Plugin. These plugins are pivotal in manipulating data within Ansible playbooks, providing a means to transform and shape information as it flows through your automation processes.
In essence, filter plugins serve as the artisans of your data, sculpting it into the desired form. Understanding their significance and incorporating them into your playbook arsenal can elevate your Ansible experience. Let’s delve into the basics of filter plugins and unveil the art of data transformation in Ansible.
Structure and Syntax:
Filter plugins in Ansible follow a straightforward structure. They are Python scripts, typically residing in a designated directory, and adhere to a prescribed naming convention. The structure ensures seamless integration into Ansible playbooks.
The syntax of a filter plugin involves defining functions that perform specific transformations on input data. These functions are then invoked within playbooks to process variables and shape the data according to the defined logic.
Manipulating Data:
At the core of filter plugins lies their ability to manipulate data during playbook execution. Whether it’s formatting strings, extracting specific information, or performing complex calculations, filter plugins act as the data alchemists, refining raw information into a usable and meaningful state.
Filter Plugin Creation Steps:
Creating a custom filter plugin in Ansible is a straightforward yet powerful process that allows you to extend the platform’s capabilities according to your specific needs. Let’s break down the steps to guide you through the creation of your filter plugin.
Step 1: Directory Structure
Begin by creating a dedicated directory for your filter plugins within your Ansible project. This directory should be named filter_plugins and placed in the root of your project. Ansible will automatically recognize and load filter plugins from this directory.
ansible_dir/
├── filter_plugins
│   └── custom_plugins.py
└── test.yml
Step 2: Python Script
Inside the filter_plugins directory, create a Python script for your filter plugin. Ensure the script follows the naming convention custom_plugins.py(replace “custom_plugins” with a name that reflects the purpose of your plugin).
Step 3: Write the Filter Functions
Inside the custom_plugins.py script, we defined two filter functions within the FilterModule class. These functions encapsulate specific data transformations:
#!/usr/bin/python3

class FilterModule(object):
    def filters(self):
        return {
            'custom_upper': self.custom_upper,
            'custom_capital': self.custom_capital
        }

    def custom_upper(self, input_text):
        return input_text.upper()

    def custom_capital(self, input_text):
        return input_text.capitalize()
- Class Definition (
FilterModule): We’ve created a class namedFilterModule. This is a way Ansible organizes filter plugins. filtersMethod: Inside the class, there’s a method calledfilters. It returns a dictionary where we define filter names (‘custom_upper’ and ‘custom_capital’) and link them to actual functions.- Filter Functions (
custom_upperandcustom_capital):
- The
custom_upperthe function takes some text (input_text) and turns it into all capital letters. - The
custom_capitalthe function takes some text (input_text) and makes the first letter uppercase while keeping the rest in lowercase.
Step 4: Naming Convention
Selecting a meaningful and descriptive name for your filter plugin is crucial. The name should align with the purpose of the plugin, making it intuitive for others (and yourself) to understand its function. Avoid generic names that may lead to confusion in the future.
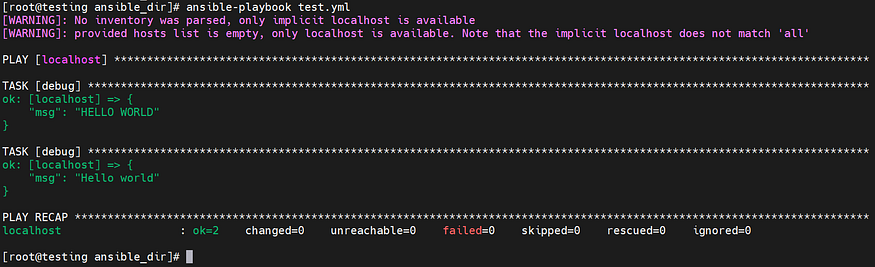
Step 5: Integration with Playbooks
Once your filter plugin is created, you can seamlessly integrate it into your Ansible playbooks. Reference the filter plugin functions within the {{ }} Jinja templating syntax to apply the desired transformations to your variables.
- hosts: localhost
  gather_facts: false
  vars:
    my_text: "hello world"
  tasks:
    - ansible.builtin.debug:
        msg: "{{ my_text | custom_upper }}"
    - ansible.builtin.debug:
        msg: "{{ my_text | custom_capital  }}"
By following these steps, you’ve successfully created and integrated a custom filter plugin into your Ansible project. The chosen name reflects its purpose, making your automation workflows more transparent and maintainable.
Real-world Use Cases
- Data Validation: Validate critical variables
user_inputusing the custom filter pluginvalidate_data. This ensures that only data meeting specific criteria is utilized in tasks, enhancing the reliability and security of your Ansible playbooks. - Data Extraction from JSON: Empower your Ansible playbook with a personalized touch by creating a custom filter. Use
json_extractionto tailor the extraction of specific values from JSON data, customizing your automation to suit unique requirements.
Best Practices for Filter Plugin Development:
- Meaningful Names: Choose descriptive names for clarity and easy comprehension of your filter functions.
- Error Handling: Prioritize robust error handling to gracefully manage unexpected scenarios and provide helpful messages.
- Documentation: Include clear and concise docstrings to guide users on the purpose and usage of your filter functions.
- Unit Testing: Write thorough unit tests to ensure the correctness and reliability of your filter functions.
- Modularity: Design modular filters with a single responsibility, promoting reusability and long-term maintainability.
In the realm of Ansible automation, the ability to craft custom filter plugins opens a gateway to tailored solutions, enhancing the flexibility and precision of your playbooks. From text transformations to dynamic data extraction, these plugins empower you to mold Ansible to the unique needs of your environment.
As we conclude, remember the significance of meaningful names, robust error handling, clear documentation, thorough unit testing, and the power of modular design in your filter plugins. By incorporating these best practices, you not only ensure the efficiency and reliability of your automation but also contribute to a collaborative Ansible community.
Whether you are a seasoned Ansible user or just beginning your automation journey, harnessing the potential of custom filter plugins can be a game-changer. Explore, experiment, and let your creativity guide you as you elevate your Ansible playbook orchestration to new heights.
Happy automating!
To check out my other blogs on Ansible and its components – click here.
If you’re new to Ansible or looking to dive deeper, check out my Ansible Playlist on YouTube for step-by-step tutorials.